Connect Membase to Cursor with one-click MCP setup. You can also use the Membase Cursor plugin for packaged rules and skills.
Cursor supports one-click MCP setup from the Membase dashboard. This is the default setup path and gives Cursor access to Membase memory and wiki tools through the hosted Membase MCP server.
1
Click "Add to Cursor" to install automatically
From the Membase dashboard, select Cursor and click the “Add to Cursor” badge.
2
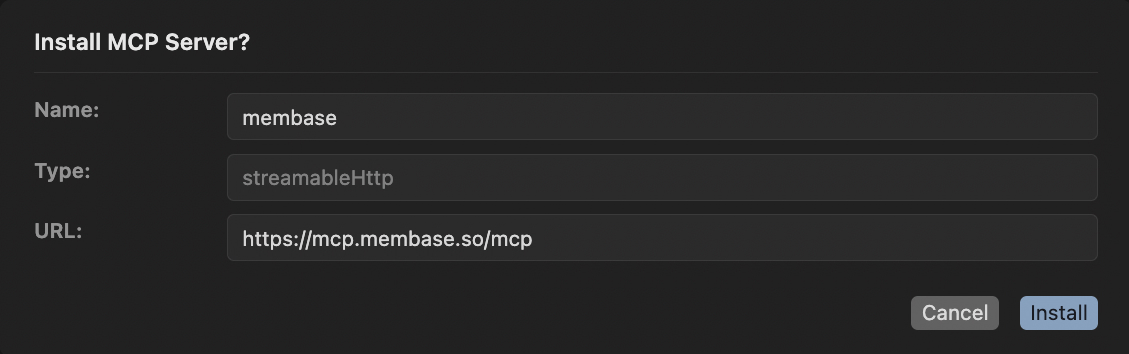
Click Install in the "Install MCP Server?" dialog
Cursor will show a confirmation dialog. Click Install to proceed.
Cursor install dialog
3
Click "Connect" next to Membase in MCP Servers section
After installation, find Membase in the MCP Servers section and click Connect.
Connect Membase in Cursor
4
Authenticate and start using Membase
A browser window opens automatically. Log in to complete authentication. Membase is now ready in Cursor.
Membase also has a Cursor plugin. The plugin uses the same hosted Membase MCP server and Cursor OAuth flow, but packages additional Cursor guidance with the connection:
MCP tools: search_memory, add_memory, get_current_date, search_wiki, add_wiki, update_wiki, and delete_wiki
Resources: membase://profile for stable user settings and membase://recent for recent memory context
Always-on rule: Guides Cursor to search and save Membase context when it is relevant
Skills: Helps Cursor choose between memory and wiki workflows for searching, saving, and managing knowledge
Install it from the Cursor Marketplace when available in your workspace, then click Connect next to the Membase MCP server in Cursor settings. No npm package, CLI login, or API key is required.
Chat with Memory, agent retrieval, and dashboard exploration.
Knowledge Wiki
Store factual knowledge alongside your memories.
Membase MCP
See every MCP tool your agent can call.
Was this page helpful?
{"docsConfig":{"theme":"aspen","$schema":"https://mintlify.com/docs.json","name":"Membase","description":"Persistent, shared memory for your AI agents.","colors":{"primary":"#229EFF","light":"#1A8DE6","dark":"#229EFF"},"logo":{"light":"https://mintcdn.com/aristo_2/9bbNV6ZLOD_5hYTx/logo/light.png?fit=max\u0026auto=format\u0026n=9bbNV6ZLOD_5hYTx\u0026q=85\u0026s=c0036161b1567cf4553281a50465364f","dark":"https://mintcdn.com/aristo_2/9bbNV6ZLOD_5hYTx/logo/dark.png?fit=max\u0026auto=format\u0026n=9bbNV6ZLOD_5hYTx\u0026q=85\u0026s=d3bc9a972e3427a316ee6ebd7dbccf79","href":"https://docs.membase.so"},"favicon":"https://mintcdn.com/aristo_2/9bbNV6ZLOD_5hYTx/images/logos/favicon.png?fit=max\u0026auto=format\u0026n=9bbNV6ZLOD_5hYTx\u0026q=85\u0026s=2752bdf23d5f5aa136406f3124c8000a","appearance":{"default":"system","strict":false},"background":{"decoration":"windows"},"navbar":{"links":[{"href":"https://docs.membase.so/support/faqs","label":"Support"}],"primary":{"type":"button","label":"Go to Dashboard","href":"https://app.membase.so"}},"footer":{"socials":{"discord":"https://discord.gg/vHgtDd6UTK","x":"https://x.com/intent/follow?screen_name=mem_base","github":"https://github.com/aristoapp/membase","linkedin":"https://www.linkedin.com/company/aristo"}},"contextual":{"options":["copy","view","chatgpt","claude","perplexity","mcp","cursor","vscode"],"display":"header"},"styling":{"latex":false},"navigation":{"global":{"anchors":[{"anchor":"Changelog","icon":"clock-rotate-left","href":"https://docs.membase.so/changelog/index"},{"anchor":"Community","icon":"discord","href":"https://discord.gg/vHgtDd6UTK"}]},"pages":[]}},"deployment":{"deploymentMetadataValue":{"subdomain":"aristo_2","hasAudioNarration":false,"actualSubdomain":"aristo_2","customDomains":["docs.membase.so"],"gitSource":{"type":"github","owner":"aristoapp","repo":"membase-core","deployBranch":"docs","contentDirectory":"apps/docs","isPrivate":true,"mountPath":"","label":""},"chroma":{"liveDeploymentHistoryId":"6a55842209b6111cdf76e753","collectionId":"d8fb1158-62a4-490d-9a5c-28d35afcc44e","schemaVersion":"v3"},"feedback":{"thumbs":true},"entitlements":{},"buildId":"6a55842209b6111cdf76e753:success","clientVersion":"0.0.3933","searchFilterCounts":[{"language":"default","tag":"Guides","count":25},{"language":"default","tag":"Connectors","count":13},{"language":"default","tag":"Agents","count":10},{"language":"default","tag":"Features","count":4},{"language":"default","tag":"Getting Started","count":4},{"language":"default","tag":"Changelog","count":2},{"language":"default","tag":"Core Concepts","count":2},{"language":"default","tag":"Support","count":2}]},"assistantConfig":{"enableAskAiButton":false,"enableStarterQuestions":false,"enableAskAiSearchBar":true},"hasChatPermissions":false,"hasWebMcpPermissions":false,"toggles":[{"name":"kill-isr","enabled":true,"variant":{"name":"disabled","enabled":false,"feature_enabled":true},"impressionData":false},{"name":"agent-mintlify-slack","enabled":true,"variant":{"name":"disabled","enabled":false,"feature_enabled":true},"impressionData":false},{"name":"editor-v7-file-tree","enabled":true,"variant":{"name":"disabled","enabled":false,"feature_enabled":true},"impressionData":false},{"name":"agent-integrations-settings","enabled":true,"variant":{"name":"disabled","enabled":false,"feature_enabled":true},"impressionData":false},{"name":"automations-pr-grouping","enabled":true,"variant":{"name":"disabled","enabled":false,"feature_enabled":true},"impressionData":false},{"name":"custom-prefix","enabled":true,"variant":{"name":"disabled","enabled":false,"feature_enabled":true},"impressionData":false},{"name":"analytics-v7","enabled":true,"variant":{"name":"disabled","enabled":false,"feature_enabled":true},"impressionData":false},{"name":"user-flows-analytics","enabled":true,"variant":{"name":"disabled","enabled":false,"feature_enabled":true},"impressionData":false},{"name":"no-publish-flow","enabled":true,"variant":{"name":"disabled","enabled":false,"feature_enabled":true},"impressionData":false},{"name":"workos-onboarding","enabled":true,"variant":{"name":"disabled","enabled":false,"feature_enabled":true},"impressionData":false},{"name":"llms-txt-v2","enabled":true,"variant":{"name":"disabled","enabled":false,"feature_enabled":true},"impressionData":false},{"name":"pause-universal-search-reconcile","enabled":true,"variant":{"name":"disabled","enabled":false,"feature_enabled":true},"impressionData":false},{"name":"snapshot-serving-live","enabled":true,"variant":{"name":"disabled","enabled":false,"feature_enabled":true},"impressionData":false},{"name":"stripTemperatureMiddleware","enabled":true,"variant":{"name":"disabled","enabled":false,"feature_enabled":true},"impressionData":false},{"name":"per-site-search-delta","enabled":true,"variant":{"name":"disabled","enabled":false,"feature_enabled":true},"impressionData":false},{"name":"support-platform-pylon-zendesk","enabled":true,"variant":{"name":"disabled","enabled":false,"feature_enabled":true},"impressionData":false},{"name":"snapshot-serving","enabled":true,"variant":{"name":"disabled","enabled":false,"feature_enabled":true},"impressionData":false},{"name":"instant-rollback","enabled":true,"variant":{"name":"disabled","enabled":false,"feature_enabled":true},"impressionData":false},{"name":"granular-notifications-server","enabled":true,"variant":{"name":"disabled","enabled":false,"feature_enabled":true},"impressionData":false},{"name":"granular-notifications","enabled":true,"variant":{"name":"disabled","enabled":false,"feature_enabled":true},"impressionData":false},{"name":"editor-private-page-search","enabled":true,"variant":{"name":"disabled","enabled":false,"feature_enabled":true},"impressionData":false},{"name":"automations-fable","enabled":true,"variant":{"name":"disabled","enabled":false,"feature_enabled":true},"impressionData":false},{"name":"fixed-ai-action-pricing","enabled":true,"variant":{"name":"disabled","enabled":false,"feature_enabled":true},"impressionData":false},{"name":"automation-resolve-merge-conflict","enabled":true,"variant":{"name":"disabled","enabled":false,"feature_enabled":true},"impressionData":false},{"name":"scoped-publishing","enabled":true,"variant":{"name":"disabled","enabled":false,"feature_enabled":true},"impressionData":false},{"name":"mintql","enabled":true,"variant":{"name":"disabled","enabled":false,"feature_enabled":true},"impressionData":false},{"name":"page-level-analytics","enabled":true,"variant":{"name":"disabled","enabled":false,"feature_enabled":true},"impressionData":false},{"name":"editor-version-history-v2","enabled":true,"variant":{"name":"disabled","enabled":false,"feature_enabled":true},"impressionData":false},{"name":"editor-nav-generations","enabled":true,"variant":{"name":"disabled","enabled":false,"feature_enabled":true},"impressionData":false},{"name":"billing-page-v2","enabled":true,"variant":{"name":"disabled","enabled":false,"feature_enabled":true},"impressionData":false},{"name":"vite-origin","enabled":true,"variant":{"name":"disabled","enabled":false,"feature_enabled":true},"impressionData":false},{"name":"workspace-projects","enabled":true,"variant":{"name":"disabled","enabled":false,"feature_enabled":true},"impressionData":false},{"name":"assistant-v5","enabled":true,"variant":{"name":"disabled","enabled":false,"feature_enabled":true},"impressionData":false},{"name":"byok-sep-25","enabled":true,"variant":{"name":"disabled","enabled":false,"feature_enabled":true},"impressionData":false},{"name":"fork-pr-previews","enabled":true,"variant":{"name":"disabled","enabled":false,"feature_enabled":true},"impressionData":false},{"name":"revalidation-jwt","enabled":true,"variant":{"name":"disabled","enabled":false,"feature_enabled":true},"impressionData":false},{"name":"editor-agent-model-picker","enabled":true,"variant":{"name":"disabled","enabled":false,"feature_enabled":true},"impressionData":false},{"name":"billing-updated-9-15","enabled":true,"variant":{"name":"disabled","enabled":false,"feature_enabled":true},"impressionData":false},{"name":"hobby-abuse-scan","enabled":true,"variant":{"name":"disabled","enabled":false,"feature_enabled":true},"impressionData":false},{"name":"dashboard-inbox","enabled":true,"variant":{"name":"disabled","enabled":false,"feature_enabled":true},"impressionData":false}],"isAtlas":false,"googleFontsInlined":false},"customCss":[],"page":{"pagePath":"connectors/agents/cursor","slug":"/connectors/agents/cursor","pageMetadata":{"title":"Cursor","sidebarTitle":"Cursor","description":"Connect Membase to Cursor with one-click MCP setup. You can also use the Membase Cursor plugin for packaged rules and skills.","href":"/connectors/agents/cursor"},"description":{"compiledSource":"\"use strict\";\nconst {jsx: _jsx} = arguments[0];\nconst {useMDXComponents: _provideComponents} = arguments[0];\nfunction _createMdxContent(props) {\n const _components = {\n p: \"p\",\n ..._provideComponents(),\n ...props.components\n };\n return _jsx(_components.p, {\n children: \"Connect Membase to Cursor with one-click MCP setup. You can also use the Membase Cursor plugin for packaged rules and skills.\"\n });\n}\nfunction MDXContent(props = {}) {\n const {wrapper: MDXLayout} = {\n ..._provideComponents(),\n ...props.components\n };\n return MDXLayout ? _jsx(MDXLayout, {\n ...props,\n children: _jsx(_createMdxContent, {\n ...props\n })\n }) : _createMdxContent(props);\n}\nreturn {\n default: MDXContent\n};\n","frontmatter":{},"scope":{}},"pageType":"default","mdx":{"mdxSource":{"compiledSource":"\"use strict\";const{Fragment:_Fragment,jsx:_jsx,jsxs:_jsxs}=arguments[0];const{useMDXComponents:_provideComponents}=arguments[0];function _createMdxContent(props){const _components={a:`a`,code:`code`,li:`li`,p:`p`,strong:`strong`,ul:`ul`,..._provideComponents(),...props.components},{Accordion,AccordionGroup,Card,CardGroup,Frame,Heading,OptimizedImage,Step,Steps}=_components;if(!Accordion)_missingMdxReference(`Accordion`,true);if(!AccordionGroup)_missingMdxReference(`AccordionGroup`,true);if(!Card)_missingMdxReference(`Card`,true);if(!CardGroup)_missingMdxReference(`CardGroup`,true);if(!Frame)_missingMdxReference(`Frame`,true);if(!Heading)_missingMdxReference(`Heading`,true);if(!OptimizedImage)_missingMdxReference(`OptimizedImage`,true);if(!Step)_missingMdxReference(`Step`,true);if(!Steps)_missingMdxReference(`Steps`,true);return _jsxs(_Fragment,{children:[_jsxs(_components.p,{children:[`Cursor supports `,_jsx(_components.strong,{children:`one-click MCP setup`}),` from the Membase dashboard. This is the default setup path and gives Cursor access to Membase memory and wiki tools through the hosted Membase MCP server.`]}),`\n`,_jsxs(Steps,{children:[_jsx(Step,{title:`Click \"Add to Cursor\" to install automatically`,children:_jsxs(_components.p,{children:[`From the `,_jsx(_components.a,{href:`https://app.membase.so`,children:`Membase dashboard`}),`, select Cursor and click the `,_jsx(_components.strong,{children:`“Add to Cursor”`}),` badge.`]})}),_jsxs(Step,{title:`Click Install in the \"Install MCP Server?\" dialog`,children:[_jsxs(_components.p,{children:[`Cursor will show a confirmation dialog. Click `,_jsx(_components.strong,{children:`Install`}),` to proceed.`]}),_jsx(Frame,{caption:`Cursor install dialog`,children:_jsx(OptimizedImage,{src:`https://mintcdn.com/aristo_2/SyC5fNZLZj3t6Psb/images/installation/cursor-step2.png?fit=max\u0026auto=format\u0026n=SyC5fNZLZj3t6Psb\u0026q=85\u0026s=f4ef929c64aee63020cf20e385164b99`,alt:`Cursor install dialog`,\"data-og-width\":`1129`,width:`1129`,\"data-og-height\":`354`,height:`354`,\"data-path\":`images/installation/cursor-step2.png`,\"data-optimize\":`true`,\"data-opv\":`3`,srcset:`https://mintcdn.com/aristo_2/SyC5fNZLZj3t6Psb/images/installation/cursor-step2.png?w=280\u0026fit=max\u0026auto=format\u0026n=SyC5fNZLZj3t6Psb\u0026q=85\u0026s=dd8a445035436f1441f87dda66ae39b6 280w, https://mintcdn.com/aristo_2/SyC5fNZLZj3t6Psb/images/installation/cursor-step2.png?w=560\u0026fit=max\u0026auto=format\u0026n=SyC5fNZLZj3t6Psb\u0026q=85\u0026s=558292af919faea31e387c872517e576 560w, https://mintcdn.com/aristo_2/SyC5fNZLZj3t6Psb/images/installation/cursor-step2.png?w=840\u0026fit=max\u0026auto=format\u0026n=SyC5fNZLZj3t6Psb\u0026q=85\u0026s=8ffacd63a4190b8b917d721f4fca62b8 840w, https://mintcdn.com/aristo_2/SyC5fNZLZj3t6Psb/images/installation/cursor-step2.png?w=1100\u0026fit=max\u0026auto=format\u0026n=SyC5fNZLZj3t6Psb\u0026q=85\u0026s=86619460ad24e9dfe5cb2a8c9b062830 1100w, https://mintcdn.com/aristo_2/SyC5fNZLZj3t6Psb/images/installation/cursor-step2.png?w=1650\u0026fit=max\u0026auto=format\u0026n=SyC5fNZLZj3t6Psb\u0026q=85\u0026s=8867ace56ff92a0c90ff25d0e3453a0a 1650w, https://mintcdn.com/aristo_2/SyC5fNZLZj3t6Psb/images/installation/cursor-step2.png?w=2500\u0026fit=max\u0026auto=format\u0026n=SyC5fNZLZj3t6Psb\u0026q=85\u0026s=a4c504154264d99d547e124290b50a90 2500w`})})]}),_jsxs(Step,{title:`Click \"Connect\" next to Membase in MCP Servers section`,children:[_jsxs(_components.p,{children:[`After installation, find Membase in the MCP Servers section and click `,_jsx(_components.strong,{children:`Connect`}),`.`]}),_jsx(Frame,{caption:`Connect Membase in Cursor`,children:_jsx(OptimizedImage,{src:`https://mintcdn.com/aristo_2/SyC5fNZLZj3t6Psb/images/installation/cursor-step3.png?fit=max\u0026auto=format\u0026n=SyC5fNZLZj3t6Psb\u0026q=85\u0026s=ce48d9ba4a842f52b06e0cfd6cae189a`,alt:`Connect Membase in Cursor`,\"data-og-width\":`1158`,width:`1158`,\"data-og-height\":`159`,height:`159`,\"data-path\":`images/installation/cursor-step3.png`,\"data-optimize\":`true`,\"data-opv\":`3`,srcset:`https://mintcdn.com/aristo_2/SyC5fNZLZj3t6Psb/images/installation/cursor-step3.png?w=280\u0026fit=max\u0026auto=format\u0026n=SyC5fNZLZj3t6Psb\u0026q=85\u0026s=3d431774fee5d6d823599316fde2508b 280w, https://mintcdn.com/aristo_2/SyC5fNZLZj3t6Psb/images/installation/cursor-step3.png?w=560\u0026fit=max\u0026auto=format\u0026n=SyC5fNZLZj3t6Psb\u0026q=85\u0026s=8f87929240af1c991268b0a9c14d1599 560w, https://mintcdn.com/aristo_2/SyC5fNZLZj3t6Psb/images/installation/cursor-step3.png?w=840\u0026fit=max\u0026auto=format\u0026n=SyC5fNZLZj3t6Psb\u0026q=85\u0026s=69b161491bdd7c104e995e5aadcc15db 840w, https://mintcdn.com/aristo_2/SyC5fNZLZj3t6Psb/images/installation/cursor-step3.png?w=1100\u0026fit=max\u0026auto=format\u0026n=SyC5fNZLZj3t6Psb\u0026q=85\u0026s=39b90768a168b2067387941c9caa0f31 1100w, https://mintcdn.com/aristo_2/SyC5fNZLZj3t6Psb/images/installation/cursor-step3.png?w=1650\u0026fit=max\u0026auto=format\u0026n=SyC5fNZLZj3t6Psb\u0026q=85\u0026s=fdcc23a0ec6e00697c843801bec7d95e 1650w, https://mintcdn.com/aristo_2/SyC5fNZLZj3t6Psb/images/installation/cursor-step3.png?w=2500\u0026fit=max\u0026auto=format\u0026n=SyC5fNZLZj3t6Psb\u0026q=85\u0026s=af8244f87e3fdb788bfbd72c1773d6e8 2500w`})})]}),_jsx(Step,{title:`Authenticate and start using Membase`,children:_jsx(_components.p,{children:`A browser window opens automatically. Log in to complete authentication. Membase is now ready in Cursor.`})})]}),`\n`,_jsx(Heading,{level:`2`,id:`cursor-plugin`,children:`Cursor Plugin`}),`\n`,_jsxs(_components.p,{children:[`Membase also has a `,_jsx(_components.a,{href:`https://github.com/aristoapp/cursor-membase`,children:`Cursor plugin`}),`. The plugin uses the same hosted Membase MCP server and Cursor OAuth flow, but packages additional Cursor guidance with the connection:`]}),`\n`,_jsxs(_components.ul,{children:[`\n`,_jsxs(_components.li,{children:[_jsx(_components.strong,{children:`MCP tools`}),`: `,_jsx(_components.code,{children:`search_memory`}),`, `,_jsx(_components.code,{children:`add_memory`}),`, `,_jsx(_components.code,{children:`get_current_date`}),`, `,_jsx(_components.code,{children:`search_wiki`}),`, `,_jsx(_components.code,{children:`add_wiki`}),`, `,_jsx(_components.code,{children:`update_wiki`}),`, and `,_jsx(_components.code,{children:`delete_wiki`})]}),`\n`,_jsxs(_components.li,{children:[_jsx(_components.strong,{children:`Resources`}),`: `,_jsx(_components.code,{children:`membase://profile`}),` for stable user settings and `,_jsx(_components.code,{children:`membase://recent`}),` for recent memory context`]}),`\n`,_jsxs(_components.li,{children:[_jsx(_components.strong,{children:`Always-on rule`}),`: Guides Cursor to search and save Membase context when it is relevant`]}),`\n`,_jsxs(_components.li,{children:[_jsx(_components.strong,{children:`Skills`}),`: Helps Cursor choose between memory and wiki workflows for searching, saving, and managing knowledge`]}),`\n`]}),`\n`,_jsxs(_components.p,{children:[`Install it from the `,_jsx(_components.a,{href:`https://cursor.com/marketplace`,children:`Cursor Marketplace`}),` when available in your workspace, then click `,_jsx(_components.strong,{children:`Connect`}),` next to the Membase MCP server in Cursor settings. No npm package, CLI login, or API key is required.`]}),`\n`,_jsx(Heading,{level:`2`,id:`troubleshooting`,children:`Troubleshooting`}),`\n`,_jsxs(AccordionGroup,{children:[_jsx(Accordion,{title:`I do not see Membase in the Cursor Marketplace`,id:`i-do-not-see-membase-in-the-cursor-marketplace`,children:_jsx(_components.p,{children:`Use the one-click MCP setup from the Membase dashboard. It connects Cursor to the same hosted Membase MCP server and supports memory and wiki tools.`})}),_jsx(Accordion,{title:`Cursor asks me to connect the MCP server again`,id:`cursor-asks-me-to-connect-the-mcp-server-again`,children:_jsxs(_components.p,{children:[`Click `,_jsx(_components.strong,{children:`Connect`}),` next to the Membase MCP server in Cursor settings and complete browser OAuth. Cursor owns the OAuth connection for this setup.`]})}),_jsx(Accordion,{title:`I already installed Membase through one-click MCP setup`,id:`i-already-installed-membase-through-one-click-mcp-setup`,children:_jsx(_components.p,{children:`You can keep that setup. If you later install the Cursor plugin, remove duplicate Membase MCP entries if Cursor shows the same tools twice.`})})]}),`\n`,_jsx(Heading,{level:`2`,id:`next-steps`,children:`Next Steps`}),`\n`,_jsxs(CardGroup,{cols:2,children:[_jsx(Card,{title:`Bring Your Context`,icon:`download`,href:`/getting-started/bring-context`,children:_jsx(_components.p,{children:`Import chat history, connect apps, and more.`})}),_jsx(Card,{title:`Use Your Context`,icon:`comment-dots`,href:`/getting-started/use-context`,children:_jsx(_components.p,{children:`Chat with Memory, agent retrieval, and dashboard exploration.`})}),_jsx(Card,{title:`Knowledge Wiki`,icon:`book`,href:`/features/wiki`,children:_jsx(_components.p,{children:`Store factual knowledge alongside your memories.`})}),_jsx(Card,{title:`Membase MCP`,icon:`link`,href:`/features/membase-mcp`,children:_jsx(_components.p,{children:`See every MCP tool your agent can call.`})})]})]})}function MDXContent(props={}){const{wrapper:MDXLayout}={..._provideComponents(),...props.components};return MDXLayout?_jsx(MDXLayout,{...props,children:_jsx(_createMdxContent,{...props})}):_createMdxContent(props)}return{default:MDXContent};function _missingMdxReference(id,component){throw new Error(`Expected `+(component?`component`:`object`)+\" `\"+id+\"` to be defined: you likely forgot to import, pass, or provide it.\")}","frontmatter":{},"scope":{"config":{},"pageMetadata":{"title":"Cursor","sidebarTitle":"Cursor","description":"Connect Membase to Cursor with one-click MCP setup. You can also use the Membase Cursor plugin for packaged rules and skills.","href":"/connectors/agents/cursor"}}},"mdxSourceWithNoJs":null},"mdxExtracts":{"tableOfContents":[{"title":"Cursor Plugin","slug":"cursor-plugin","depth":2,"children":[]},{"title":"Troubleshooting","slug":"troubleshooting","depth":2,"children":[]},{"title":"Next Steps","slug":"next-steps","depth":2,"children":[]}],"codeExamples":{}},"jsLinks":[],"subdomain":"aristo--5f--2","siteName":"Membase","title":"Cursor - Membase","navMaps":{"firstHrefInVersion":{},"firstHrefInLanguage":{}},"lastModified":"2026-05-06T04:30:59.869Z","originalFileLocation":"connectors/agents/cursor.mdx"},"headHtml":"\u003cscript data-mint-head>(function(){var d=document.documentElement,p=null;if(!p){try{p=localStorage.getItem(\"isDarkMode\")}catch(e){}if(p==='true')p='dark';else if(p==='false')p='light';if(p!=='light'\u0026\u0026p!=='dark'\u0026\u0026p!=='system')p=\"system\"}var r=p==='system'?(matchMedia(\"(prefers-color-scheme: dark)\").matches?'dark':'light'):p;d.classList.remove(r==='dark'?'light':'dark');d.classList.add(r);d.setAttribute(\"data-theme-preference\",p)})();\u003c/script>\u003cmeta data-mint-head name=\"description\" content=\"Connect Membase to Cursor with one-click MCP setup. You can also use the Membase Cursor plugin for packaged rules and skills.\">\u003cmeta data-mint-head name=\"application-name\" content=\"Membase\">\u003cmeta data-mint-head name=\"generator\" content=\"Mintlify\">\u003clink data-mint-head rel=\"icon\" type=\"image/png\" sizes=\"192x192\" href=\"/mintlify-assets/_mintlify/favicons/aristo_2/E2N6yghF4zpbuwju/_generated/favicon/android-chrome-192x192.png\" media=\"(prefers-color-scheme: light)\">\u003clink data-mint-head rel=\"apple-touch-icon\" type=\"image/png\" sizes=\"180x180\" href=\"/mintlify-assets/_mintlify/favicons/aristo_2/E2N6yghF4zpbuwju/_generated/favicon/apple-touch-icon.png\">\u003clink data-mint-head rel=\"icon\" type=\"image/png\" sizes=\"16x16\" href=\"/mintlify-assets/_mintlify/favicons/aristo_2/E2N6yghF4zpbuwju/_generated/favicon/favicon-16x16.png\" media=\"(prefers-color-scheme: light)\">\u003clink data-mint-head rel=\"icon\" type=\"image/png\" sizes=\"32x32\" href=\"/mintlify-assets/_mintlify/favicons/aristo_2/E2N6yghF4zpbuwju/_generated/favicon/favicon-32x32.png\" media=\"(prefers-color-scheme: light)\">\u003clink data-mint-head rel=\"shortcut icon\" type=\"image/x-icon\" href=\"/mintlify-assets/_mintlify/favicons/aristo_2/E2N6yghF4zpbuwju/_generated/favicon/favicon.ico\" media=\"(prefers-color-scheme: light)\">\u003clink data-mint-head rel=\"icon\" type=\"image/png\" sizes=\"192x192\" href=\"/mintlify-assets/_mintlify/favicons/aristo_2/E2N6yghF4zpbuwju/_generated/favicon-dark/android-chrome-192x192.png\" media=\"(prefers-color-scheme: dark)\">\u003clink data-mint-head rel=\"icon\" type=\"image/png\" sizes=\"16x16\" href=\"/mintlify-assets/_mintlify/favicons/aristo_2/E2N6yghF4zpbuwju/_generated/favicon-dark/favicon-16x16.png\" media=\"(prefers-color-scheme: dark)\">\u003clink data-mint-head rel=\"icon\" type=\"image/png\" sizes=\"32x32\" href=\"/mintlify-assets/_mintlify/favicons/aristo_2/E2N6yghF4zpbuwju/_generated/favicon-dark/favicon-32x32.png\" media=\"(prefers-color-scheme: dark)\">\u003clink data-mint-head rel=\"shortcut icon\" type=\"image/x-icon\" href=\"/mintlify-assets/_mintlify/favicons/aristo_2/E2N6yghF4zpbuwju/_generated/favicon-dark/favicon.ico\" media=\"(prefers-color-scheme: dark)\">\u003cmeta data-mint-head property=\"og:title\" content=\"Cursor - Membase\">\u003cmeta data-mint-head property=\"og:description\" content=\"Connect Membase to Cursor with one-click MCP setup. You can also use the Membase Cursor plugin for packaged rules and skills.\">\u003cmeta data-mint-head property=\"og:site_name\" content=\"Membase\">\u003cmeta data-mint-head property=\"og:url\" content=\"https://docs.membase.so/connectors/agents/cursor\">\u003cmeta data-mint-head property=\"og:type\" content=\"website\">\u003cmeta data-mint-head property=\"og:image\" content=\"https://aristo_2.mintlify.app/_mintlify/api/og/v2?division=Agents\u0026amp;title=Cursor\u0026amp;description=Connect+Membase+to+Cursor+with+one-click+MCP+setup.+You+can+also+use+the+Membase+Cursor+plugin+for+packaged+rules+and+skills.\u0026amp;theme=e455043187cf52e15a1276a3\u0026amp;signature=7c6a895a8de1326ba91cd0c9f20b0a1c4b8220da8510d89d6477cf0d28d9d462\">\u003cmeta data-mint-head property=\"og:image:width\" content=\"1200\">\u003cmeta data-mint-head property=\"og:image:height\" content=\"630\">\u003cmeta data-mint-head name=\"twitter:card\" content=\"summary_large_image\">\u003cmeta data-mint-head name=\"twitter:title\" content=\"Cursor - Membase\">\u003cmeta data-mint-head name=\"twitter:description\" content=\"Connect Membase to Cursor with one-click MCP setup. You can also use the Membase Cursor plugin for packaged rules and skills.\">\u003cmeta data-mint-head name=\"twitter:image\" content=\"https://aristo_2.mintlify.app/_mintlify/api/og/v2?division=Agents\u0026amp;title=Cursor\u0026amp;description=Connect+Membase+to+Cursor+with+one-click+MCP+setup.+You+can+also+use+the+Membase+Cursor+plugin+for+packaged+rules+and+skills.\u0026amp;theme=e455043187cf52e15a1276a3\u0026amp;signature=7c6a895a8de1326ba91cd0c9f20b0a1c4b8220da8510d89d6477cf0d28d9d462\">\u003cmeta data-mint-head name=\"twitter:image:width\" content=\"1200\">\u003cmeta data-mint-head name=\"twitter:image:height\" content=\"630\">\u003cmeta data-mint-head name=\"msapplication-config\" content=\"/mintlify-assets/_mintlify/favicons/aristo_2/E2N6yghF4zpbuwju/_generated/favicon/browserconfig.xml\">\u003cmeta data-mint-head name=\"apple-mobile-web-app-title\" content=\"Membase\">\u003cmeta data-mint-head name=\"msapplication-TileColor\" content=\"#229EFF\">\u003clink data-mint-head rel=\"canonical\" href=\"https://docs.membase.so/connectors/agents/cursor\">\u003clink data-mint-head rel=\"alternate\" type=\"application/xml\" href=\"/sitemap.xml\">\u003clink data-mint-head rel=\"alternate\" type=\"text/markdown\" href=\"/connectors/agents/cursor.md\">\u003cscript data-mint-head type=\"application/ld+json\">{\"@context\":\"https://schema.org\",\"@graph\":[{\"@type\":\"Organization\",\"@id\":\"https://docs.membase.so/#organization\",\"name\":\"Membase\",\"url\":\"https://docs.membase.so\",\"logo\":{\"@type\":\"ImageObject\",\"url\":\"https://mintcdn.com/aristo_2/9bbNV6ZLOD_5hYTx/logo/light.png?fit=max\u0026auto=format\u0026n=9bbNV6ZLOD_5hYTx\u0026q=85\u0026s=c0036161b1567cf4553281a50465364f\"}},{\"@type\":\"WebSite\",\"@id\":\"https://docs.membase.so#website\",\"name\":\"Membase\",\"url\":\"https://docs.membase.so\",\"publisher\":{\"@id\":\"https://docs.membase.so/#organization\"}},{\"@type\":\"WebPage\",\"@id\":\"https://docs.membase.so/connectors/agents/cursor#webpage\",\"url\":\"https://docs.membase.so/connectors/agents/cursor\",\"name\":\"Cursor\",\"description\":\"Connect Membase to Cursor with one-click MCP setup. You can also use the Membase Cursor plugin for packaged rules and skills.\",\"dateModified\":\"2026-05-06T04:30:59.869Z\",\"isPartOf\":{\"@id\":\"https://docs.membase.so#website\"},\"breadcrumb\":{\"@id\":\"https://docs.membase.so/connectors/agents/cursor#breadcrumb\"}},{\"@type\":\"BreadcrumbList\",\"@id\":\"https://docs.membase.so/connectors/agents/cursor#breadcrumb\",\"itemListElement\":[{\"@type\":\"ListItem\",\"position\":1,\"name\":\"Membase\",\"item\":\"https://docs.membase.so\"},{\"@type\":\"ListItem\",\"position\":2,\"name\":\"Cursor\",\"item\":\"https://docs.membase.so/connectors/agents/cursor\"}]},{\"@type\":[\"Article\",\"TechArticle\"],\"@id\":\"https://docs.membase.so/connectors/agents/cursor#article\",\"headline\":\"Cursor\",\"name\":\"Cursor\",\"description\":\"Connect Membase to Cursor with one-click MCP setup. You can also use the Membase Cursor plugin for packaged rules and skills.\",\"url\":\"https://docs.membase.so/connectors/agents/cursor\",\"mainEntityOfPage\":{\"@id\":\"https://docs.membase.so/connectors/agents/cursor#webpage\"},\"dateModified\":\"2026-05-06T04:30:59.869Z\",\"publisher\":{\"@id\":\"https://docs.membase.so/#organization\"},\"isPartOf\":{\"@id\":\"https://docs.membase.so#website\"}}]}\u003c/script>\u003cscript data-mint-head type=\"application/ld+json\">{\"@context\":\"https://schema.org\",\"@type\":\"WebSite\",\"name\":\"Membase\",\"creator\":{\"@type\":\"Organization\",\"name\":\"Mintlify\",\"url\":\"https://mintlify.com\"}}\u003c/script>","siteName":"Membase","nav":{"global":{"anchors":[{"anchor":"Changelog","icon":"clock-rotate-left","href":"https://docs.membase.so/changelog/index"},{"anchor":"Community","icon":"discord","href":"https://discord.gg/vHgtDd6UTK"}]},"tabs":[{"tab":"Guides","groups":[{"group":"Getting Started","pages":[{"title":"Overview","sidebarTitle":"Overview","href":""},{"title":"Quickstart","sidebarTitle":"Quickstart","href":"/getting-started/quickstart"},{"title":"Bring Your Context Into Membase","sidebarTitle":"How to Bring Your Context","href":"/getting-started/bring-context"},{"title":"Use Your Context in Membase","sidebarTitle":"How to Use Your Context","href":"/getting-started/use-context"}]},{"group":"Core Concepts","pages":[{"title":"How Membase Works","sidebarTitle":"How Membase Works","href":"/core-concepts/how-membase-works"},{"title":"Attached vs Universal","sidebarTitle":"Attached vs Universal","href":"/core-concepts/attached-vs-universal"}]},{"group":"Features","pages":[{"title":"Membase MCP","sidebarTitle":"Membase MCP","href":"/features/membase-mcp"},{"title":"Chat in Dashboard","sidebarTitle":"Chat","href":"/features/chat"},{"title":"Memory","sidebarTitle":"Memory","href":"/features/memory"},{"title":"Knowledge Wiki","sidebarTitle":"Wiki","description":"Store factual knowledge in Membase alongside your memories. Create Wiki documents with markdown and [[wikilinks]], organize them into Projects, import Notion/Obsidian/Markdown sources, and let agents retrieve knowledge through MCP.","href":"/features/wiki"}]},{"group":"Connectors","pages":[{"group":"Agents","pages":[{"title":"Cursor","sidebarTitle":"Cursor","href":"/connectors/agents/cursor"},{"title":"ChatGPT","sidebarTitle":"ChatGPT","description":"Connect Membase to ChatGPT as a custom app using MCP. Give ChatGPT persistent memory that remembers your preferences and context across every conversation.","href":"/connectors/agents/chatgpt"},{"title":"Claude","sidebarTitle":"Claude","href":"/connectors/agents/claude-desktop"},{"title":"Claude Code","sidebarTitle":"Claude Code","href":"/connectors/agents/claude-code"},{"title":"Codex","sidebarTitle":"Codex","href":"/connectors/agents/codex"},{"title":"VS Code","sidebarTitle":"VS Code","href":"/connectors/agents/vscode"},{"title":"Poke","sidebarTitle":"Poke","href":"/connectors/agents/poke"},{"title":"Gemini CLI","sidebarTitle":"Gemini CLI","href":"/connectors/agents/gemini-cli"},{"title":"OpenCode","sidebarTitle":"OpenCode","href":"/connectors/agents/opencode"},{"title":"Generic MCP URL","sidebarTitle":"MCP URL","href":"/connectors/agents/mcp-url"}]},{"title":"App Integrations","sidebarTitle":"Apps","href":"/connectors/apps"},{"title":"OpenClaw","sidebarTitle":"OpenClaw","href":"/connectors/openclaw"},{"title":"Hermes Agent","sidebarTitle":"Hermes","href":"/connectors/hermes"}]},{"group":"Support","pages":[{"title":"Support \u0026 Troubleshooting","sidebarTitle":"Support \u0026 Troubleshooting","href":"/support/faqs"},{"title":"Contributing","sidebarTitle":"Contributing","href":"/support/contributing"}]}]},{"tab":"Changelog","pages":[{"title":"Changelog","href":"/changelog"}]}]},"title":"Cursor - Membase","buildId":"dpl_GnxaU9nEer7XK27kw3dpfPrs9geh","deploymentId":"dpl_GnxaU9nEer7XK27kw3dpfPrs9geh","dynamics":["07c022d89b","a74be98ba7"],"chunks":["Frame-C1EX3v38.js","DynamicMarkdown-BPGty-u8.js","zoom-image-lightbox-Cv5hibpS.js","PlusIcon-owOTCErD.js","lightbox-handle-r17bVUz3.js"]}